| How-To Guide For Kitbashing Miniatures |
Before You Begin; Things To ALWAYS Remember When Kitbashing Miniatures
Kitbashing miniatures can be dangerous, you need to be careful when cutting metal especially with x-acto knives and Dremel tools. Jeweler's saws and drills aren't quite as dangerous but always be mindful of where your hands are and where the tool you're using will go when it slips. If it's going to go right into your hand or finger, you probably should figure out a different way of holding it.
Fortunately kitbashing doesn't really require a steady hand but if your hands get tired, take a break. Don't work when your hands really ache or you find yourself rushing because you'll make mistakes. Unlike painting, if you screw up a cut or obliterate some detail by mistake, it's really tough if not impossible to fix. Take breaks.
Make sure you have plenty of light, it's easier on the eyes and it's easier to see exactly where you are going to want to cut or drill. In addition to the two or three desk lamps, have another light on somewhere else in the room to provide some ambient light. This gets rid of any harsh shadows and lets you see the real detail better.
On with the kitbashing and good luck!
The Proper Tools
Kitbashing miniatures is hard on your hands and it's hard on the tools you use. If you don't have the right tools you're going to run into a lot of problems.
Get some good hobby clippers, they're really useful for quickly cutting though hunks of metal and removing bits of unwanted material. Look for the kind that have the cutting edge almost flush with the flat side, these will allow you to make more accurate cuts and minimize the amount of cleanup you'll have to do after using them.
Get a hand drill and some small drill bits. Powered drills generally don't give you the control you need to do many of the techniques described below and hand drills are much safer too. You'll make fewer mistakes too.
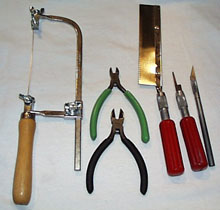
Get a Jeweler's saw, one or two of the large x-acto handle with razor saw and keyhole saw. I've been using a jeweler's saw more and more in favor of the x-acto saws but all of them come in handy in different situations. Keyhole blade saws are great if you're trying to cut in a tight spot but the blade catches and then bends quite often and you need to straighten it which is somewhat annoying. The razor saw is good for cutting through thick pieces of metal quickly and for cutting very straight lines. If you get a razor saw, definately get the miter box along with it (usually packaged with it), it's also very useful.
Get a #11 X-Acto knife, it's always really useful. Be sure it has a metal handle too, some of the hobby knives have plastic handles which are dangerous since the handle can snap in half if too much pressure is applied. You'll typically be applying a lot of pressure when kitbashing.
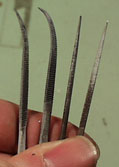
Jeweler/Needle and Riffler files are pretty useful for cleaning and flattening areas that you've cut. You can usually use the #11 x-acto for this purpose but files are a bit easier and less dangerous especially when there's a lot of material that you need to remove.
Sandpaper is also good to have on hand when you want to smooth a surface. For miniatures I like to use 400-600 grit.
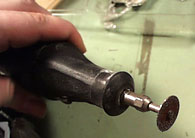
A Dremel tool is sometimes useful as it can remove material faster than a file.
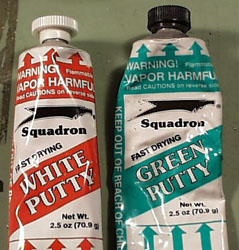
Modeling putty is also sometimes useful to fill gaps and fix mistakes. I prefer to use Squadron White or Green putty (same stuff, different color) and apply it using a palette knife. After it dries it can be sanded smooth.
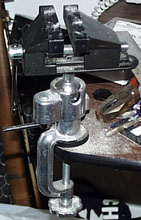
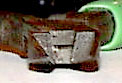
Almost most importantly, get a hobby vise like the one above preferably with rubber jaws. This will save you a lot of pain and grief when trying to cut parts.
Getting Parts
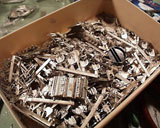
To modify and kitbash miniatures, you need parts (unless you're making really minor changes). There are several ways to get these parts depending on what you want to do and how much you want to spend. Most of the time, you'll probably want to take parts from one miniatures, cut them apart and stick them on another miniature. Now, you may think to yourself "Hey, I'm buying two miniatures in order to make only one, what a waste!" Modifying/kitbashing miniatures isn't the most economical thing to do but when you're done you'll have some really cool miniatures that no one else has.
Aside from buying the miniatures you want to use parts from and what you don't use you throw into a box for possible use the next time you kitbash you can also sometimes order the parts you want or need directly from the manufacturer. After I figure out what parts are the most versatile for kitbashing purposes, I call up the manufacturer and see if I can just buy a bunch of those parts. It's a lot cheaper to get individual parts and you get exactly what you need by doing it this way.
Also, some games have upgrade/refit/spare part blister packs available which are very useful for this purpose. Battletech spare part blisters are great for kitbashing and the Babylon 5 Wars refit/upgrade packs are ok too. Some hobby stores have bins of parts of miniatures that people throw out and you can get some pretty cool parts by rooting around in them.
Preparing The Parts
Before you start hacking away at the miniatures it's usually a good idea to get rid of the flash off of the parts. For those of you that don't know, flash is the residual bits of unwanted metal that are still sticking to the miniature as part of the casting process. Sometimes flash can catch in the teeth of a saw or dig into your fingers and generally be a pain in the ass.
Once this is done, you're ready to start being creative.
What To Do
I divide up kitbashing into two categories: Variants and New Designs. If you're new to chopping metal, you might want to just do some variants first until you feel more confident.
Variants: These are where you take a standard miniature and make minor and mostly cosmetic changes to it to make it look a little different. Adding or removing guns or fins, rearranging parts and things along those lines are really just minor adjustments.
Here's a really minor and easy to make variant for a Sho'Kos. All I did was cut the guns off of a twin array turret and stuck the ones on the sides into the dents of pre-existing detail and drilled a hole to stick the third one in the middle.

A slightly more involved variant, I chopped the barrels off of the turrets on this Artemis and replaced them with the Std Particle Beam turrets from an Omega. This makes the turrets look a little differently but otherwise doesn't alter the look of the ship.
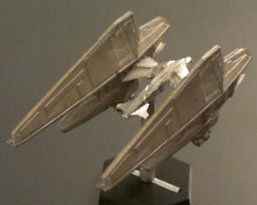
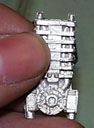
Here's a heavily modified Hyperion. I've chopped all of the turrets off of the main part of the body and replaced the ones on top with the Artemis turrets. The side turrets I replaced with half of a small Nova turret. You'll also note that I chopped off about a third of the upper structure and replaced it with part of the upper structure from a Bin'Tak. There was a little trimming and sanding involved to get these pieces to fit together as well as I had intended.

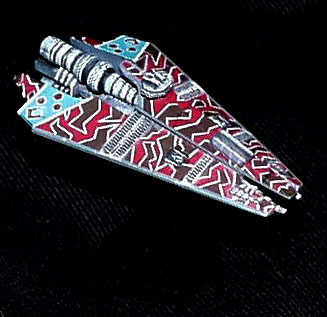
A fairly heavily modified but fairly easy to do variant of a Covran. I chopped the top and bottom fins off and stuck some smaller fins on that I thought looked pretty good instead. The side structures/engines that are normally on the Covran I placed on the underside which isn't very visible from this angle.
New Designs: This is where you actually cut ship hulls apart and stick them back together a different way to make what looks like an entirely new ship.
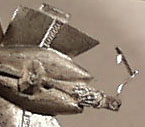
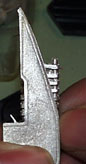
Here's one of the first new designs I made with the B5W ships. Taking a T'Loth side panel, I rotated the engine 90 degrees and added the central top and bottom structures which are actually Bin'Tak top/bottom structures that have been chopped in half. This required quite a bit of filing since the middle of the T'Loth panel ends in a sharp peak which needed to be flattened. On the top I also added one of the small parts from a T'Loth to form the bridge of the ship.
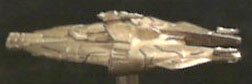
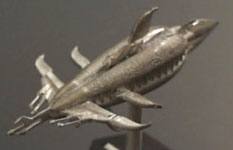
I took the central structure of a Thentus and stuck two Var'Nics on the wing tips to create a design reminicient of a T'Loth. Hey, if they make ships out of the side panels of the T'Loth, why can't they make side panels out of ships? If you haven't guessed, this is an expensive design.
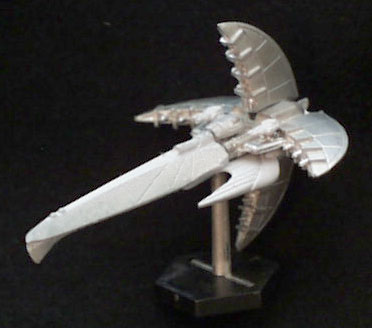
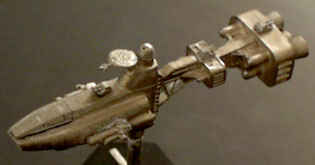
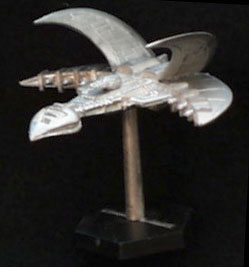
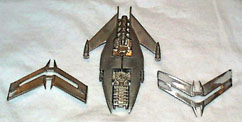
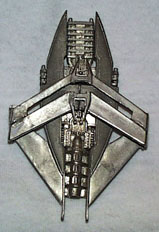
Here's another expensive design. This design is created using the nose and part of the wing structures of an Altarian, the back half of of a Vorchan with additional wings of another Vorchan to form a Centauri cruiser. I also used part of a turret (in front of the top vertical fin) from one of the packages of Battletech parts. I'm particularly fond of this creation.
You need to decide how far you want to go and what the purpose of the miniature is going to be. I build entirely new designs in order to represent ships that miniatures are not yet available for. I make variants to distinguish one ship from another but not have them look so different that they look like a different kind of ship.
Tool Techniques
The techniques used to hack, chop, mutilate and destroy your miniatures and parts are the same whether you're making a variant or a new design. Below are examples of various techniques I use with the different tools.
- Cutting With A Knife:
- There are several ways to cut things with your x-acto knife. The first technique is where you place the miniature on a flat surface that you don't care about damaging (like a cutting mat) and you press down chopping the part off.
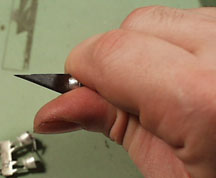
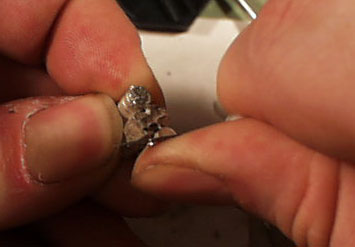
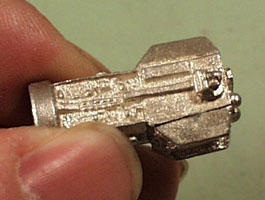
- Thumb-As-A-Cutting-Board-Technique: For cutting or trimming parts that would be awkward to use the first technique, try this: Grab the knife firmly in your fist with the sharp edge pointing toward you with your thumb joint on the handle near the point where it holds the blade. The end of your thumb should be very close to the sharp edge of the knife and in fact if you bent the tip of your thumb forward it would rest on the edge.

- Now, grab the part you're going to be cutting in the other hand and place the detail-to-be-chopped in the gap between the knife blade and thumb at the base of the sharp edge. This may sound scary but your thumb is going to be the cutting block for the knife. Support the bulk of the miniature against your thumb.
- By pinching the knife and thumb together you can generate a lot of force which will cut the part and you will end up with the bottom half of the sharp edge against your thumb. The only motion should be a gripping action with your four fingers and pushing the part into the blade with the tip of your thumb. Since the blade just presses against your skin, it won't cut (blades don't cut skin very well unless it is drawn across the skin). This technique also works a little better with dull blades as fresh super-sharp ones will sometimes make small scrape-like cuts (not deep enough to hurt but are slightly annoying) on your thumb. I've found this technique quick, safe and easy but if you don't feel comfortable doing it then don't use it, there are other ways to chop parts off.
- There are several ways to cut things with your x-acto knife. The first technique is where you place the miniature on a flat surface that you don't care about damaging (like a cutting mat) and you press down chopping the part off.
- Scraping With A Knife
- Another very useful technique is scraping. If you have some irregularity
or roughness on what is supposed to be a smooth surface, take your blade
and scrape it across the problem area.

- This will remove a very thin layer from the surface and leave it very smooth. This is a good technique to get rid of the flash or ridge along the mold seam line and to smooth out areas that have been filed or sanded. You'll note that the technique I use for scraping is the same as the thumb-as-a-cutting-board technique except the blade is rotated 90 degrees.
- Cutting With Clippers


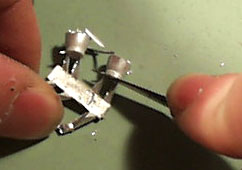
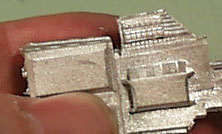
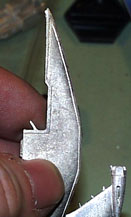
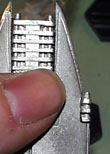
- When you cut with clippers, the two resulting pieces will be cut differently. One piece will be cut almost flush to the flat side of the clippers, the other piece will be pinched by the two wedge shapes and be squashed into a V shape. You need to keep this in mind when using clippers since the piece that gets squashed isn't usually very usable.


- You'll see in this example that I'm cutting with the flat side of the clippers toward the gun in order to separate it from the sprue. This results in a flat cut that will require only a little bit of cleanup.
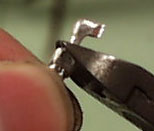

- Here, I'm cutting with the flat side of the clippers toward the sprue. The shape of the clippers prevents the cut from being very close to the gun and it will require quite a bit more cleanup.
- When you cut with clippers, the two resulting pieces will be cut differently. One piece will be cut almost flush to the flat side of the clippers, the other piece will be pinched by the two wedge shapes and be squashed into a V shape. You need to keep this in mind when using clippers since the piece that gets squashed isn't usually very usable.
- Cutting With A Jeweler's Saw
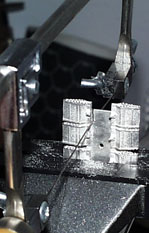
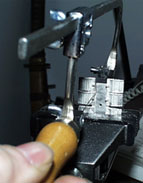
- Cutting parts with a jeweler's saw is pretty straightforward except that you need to go slowly. If you saw quickly the blade will heat up, warp and will most likely break. Blades last a lot longer when you cut slowly. After a few strokes, take a look at how the cut is progressing.
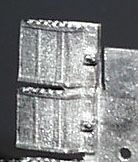
- Uh oh! In this example, my cut has started to deviate.
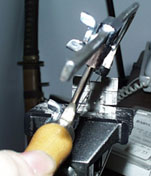
- Don't panic, put the saw back in and twist your hand a little bit to adjust the direction of the cut. The thinness and flexibility of the jewelers blade will allow you to do this but don't twist it too far or else the blade might break. Start sawing and when you're back to where the blade was supposed to be, straighten out and continue cutting as if nothing had happened.
- The little bump caused by this mistake can be easily filed or trimmed later.
- Cutting parts with a jeweler's saw is pretty straightforward except that you need to go slowly. If you saw quickly the blade will heat up, warp and will most likely break. Blades last a lot longer when you cut slowly. After a few strokes, take a look at how the cut is progressing.
- Cutting With A Razor Saw And Miter Box
- A razor saw is stronger and more durable than a jewelers saw. You can cut
through thick parts quickly with one of these without worrying about bending
or breaking the blade (usually). The downside is that being a flat piece
of metal, if your cutting angle is off, it's going to be hard to redirect
it like you can the jewelers saw.
- It's usually best to hold the part you're cutting firmly against one side or the other of the miter box when cutting. It will be hard to hold once you start cutting and the fingers holding the part will get tired quickly.
- Cutting With A Dremel Tool
- For miniature work, I use the disk cutter almost exclusively.
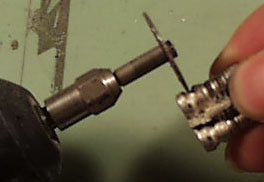
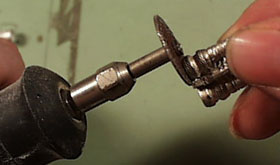
- The edge will cut metal fairly quickly and the flat surface can be used as a makeshift sander. I recommend using safety glasses since working with miniatures is very hard on these cutting disks and when they go, they shatter and explode in all directions. Also, the part that you're cutting or sanding will heat up very quickly and can burn you before you're able to drop it. Use the Dremel tool in "pulses," cut/sand for a second then release. By doing it this way, the part won't heat up as fast and you'll know when it's getting too hot to handle.
- Cutting With A Keyhole Saw
- Keyhole saws are good for getting into tight places that the larger razor
or jewelers saws can't be used for.
- They're also good for removing seam flash from crevices that an x-acto blade can't cut very well. When using one of these expect that the blade will get bent. What typically happens is you're happily sawing along and suddenly the teeth catch on something and the force you're putting behind it (because you're cutting through metal) turns the blade into a S shape. The tip of the blade will also probably snap off the first or second time this happens. You can bend it back into shape but it is still very usable. The blade on mine is over 2 years old and while it's really beat up, it still works pretty good.
- Drilling With A Hand Drill
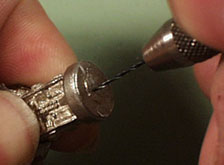
- Take the drill in hand, press the bit into the metal a little so that it won't wander once you start turning it. Begin turning the drill slowly a little bit and then check to make sure it's making a hole in the right place.
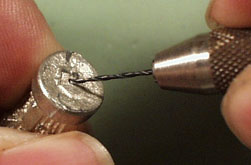
- If the hole is not in the right place, drill in the direction you need the hole to go for a few revolutions and then tilt the drill back up to vertical. This is similar to the technique to redirect a cut with a jeweler's saw.
- If you need exact placement, you can use a really tiny drill bit to make your initial hole and then redrill that hole with the larger bit. It's easier to see the tiny bit is going in the right place and the hole it makes will help guide the larger bit.
- Take the drill in hand, press the bit into the metal a little so that it won't wander once you start turning it. Begin turning the drill slowly a little bit and then check to make sure it's making a hole in the right place.
- Puttying
- Once in a while you'll find you have a seam or a gap that you don't want to be there. Putty is really the only answer. Again, the only putty I've used that I like at all is Squadron White or Green. It sticks to whatever you put it on, it sands really nicely and almost never flakes. Unless you do a lot of model building, a tube of this stuff will last forever.
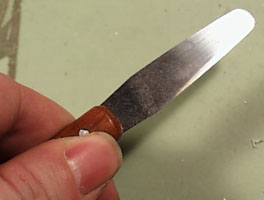
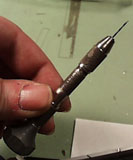
- I used to use my x-acto with a really old blade to apply the putty but I've found that the best tool by far is a small artists palette knife. I have a couple of various sizes which come in handy depending on what sort of gap that I'm filling but the most useful is the really small one with a diamond shaped head. Unfortuantely I can't seem to find the one I like to use so I'm going to use the one pictured above.
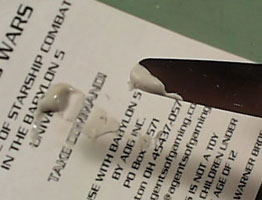

- Scrape up a little bit of putty on the palette knife and then spread it over the crack/gap applying mild pressure. Lay it on a little thick but don't get the putty in any detail that you want to keep because it will be tough to dig it out of panel lines and other details.

- Once it's dry, sand at your leisure. It should clean up fairly quickly and easily. Make sure it's dry before sanding!
- Once in a while you'll find you have a seam or a gap that you don't want to be there. Putty is really the only answer. Again, the only putty I've used that I like at all is Squadron White or Green. It sticks to whatever you put it on, it sands really nicely and almost never flakes. Unless you do a lot of model building, a tube of this stuff will last forever.
Construction Techniques
- Pinning
- Sometimes a part's connection is weak and will break easily unless you pin
it.

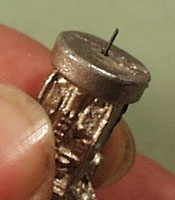
- The idea is that you drill holes opposite each other in both pieces that you're connecting together and make a bridge between the parts by sticking a cut piece of a pin or paperclip into the holes. This adds structural support to the connection and it won't break as easily.
- Mitering/Joinery
- When gluing parts together, try to get as much of the surfaces to contact
each other as you can. Sometimes you have to do a lot of filing and trimming
in order to do this but by taking the extra effort, you won't be left with
big gaps or weak connections.
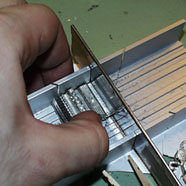
- I'm using the terms Mitering and Joinery from woodworking to describe the techniques involved. If you're attaching a part at an angle or into a corner you'll either want to sand/file the part getting attached at an angle so that it sits flush. In the above example, I attached the fins at an angle to the body and filed the base of those fins into a V to fit into the corner.
- If you have a part that is going to be put on an irregular surface, you may need to carve the connective edge in the shape of that detail. In the above Tinashi conversion, I had to cut the base of the wings such that would attach firmly to the ribbed section of the body.
- These miniatures will probably be handled a lot and if it isn't put together very well they won't last.
Thought Process
- Visualization
- I think the key to being able to kitbash miniatures is the ability to visualize
what bashing these various bits at pieces together will look like. You don't
necessarily have to know exactly what the end result will look like but
you should have at least a rough idea. Hold the pieces together and figure
out where you're going to make the cuts and how the parts are going to fit
together before you start sawing. Once you cut, you're stuck with it.
- Here's an example: I want to turn the G'Quan miniature into one that will represent a G'Quonth or other variant. Using the SCS of the G'Quonth as a reference I see that it has two heavy lasers on the sides. My first thought is "Hmm I'll have to see if I can stick some heavy lasers on the sides."
- I have a G'Quan side structure and an extra center part that has the heavy lasers.
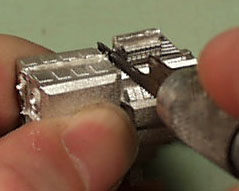
- After looking at them together in a number of different ways (mounting them on the underside, top side, on the outriggers, etc.), I think it might look the best if I inset the heavy lasers into the side of the hull. This will mean I will have to cut a triangular section out of the hull and cut one of the lasers out from the center piece to put in that spot. This will naturally have to be done for both sides.
- Ok, with that done I placed all of the parts together to see how the whole thing looks. Unfortunately the modification of this miniature was almost finished when I started working on this page so I don't have a picture of it unassembled. Anyway, I thought the added lasers looked pretty good but it didn't make the ship distinguishing enough. I thought about flipping the engine upside down or reversing the top/bottom bridges (?) but ultimately I decided something more radical had to be done.
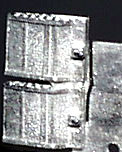
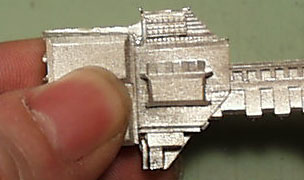
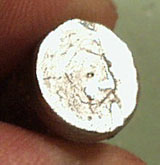
- Taking some spare bridges from the Narn/Centauri refit/upgrade pack I tried to see what I could do with four of them and ultimately settled on making a single bridge that was twice as wide. I didn't want to hide everything under the bridge and I could see that the centers of them wouldn't match very well so I killed two birds with one stone by having the idea of making a hole in the center. You'll note that I've used some putty (Squadron White or Green putty is what I like to use) to fill the gaps in the seam between the joined bridges.
- Loosely putting it all together I think this looks really cool and I've gone as far as I can until I'm able to set aside some time to paint. I've found that the bridges are best glued on after they're painted.
- Here's an example: I want to turn the G'Quan miniature into one that will represent a G'Quonth or other variant. Using the SCS of the G'Quonth as a reference I see that it has two heavy lasers on the sides. My first thought is "Hmm I'll have to see if I can stick some heavy lasers on the sides."
GOOD LUCK AND HAPPY KITBASHING!