How-To Guide For Painting Miniatures
Before You Begin; Things To ALWAYS Remember When Painting Miniatures
Painting takes time. To do a good job you have to be patient and not rush otherwise you miniature will look like crap. Some miniatures I've painted had taken me a total of about 12 hours to do (fortunately not many) but expect a miniature to take at least a couple of hours from start to finish.
Take breaks. Paint for 20 minutes and take a break; watch a movie, surf the net, whatever, just get away from the miniature. What happens is you're painting along and subconsciously, you get anxious to finish or you get a little tired and try to work faster and you make mistakes. Big Ones. Take breaks.
Mistakes will happen. The great thing about metal miniatures is that if you really screw up you can always strip the paint off and start over but that is only if you don't like color decisions or the paint has gotten too thick or something like that. Most mistakes can be fixed fairly easily though and at the early stages of painting a miniature, you shouldn't worry too much about minor errors like getting a little bit of paint on an area you didn't want it.
Be careful of wet paint. Another reason to take breaks, you can paint the miniature wonderfully and then pick it up before it's dry and suddently you've got some huge finger prints on the paint job. It usually isn't too much of a problem, just keep wet paint in mind.
Don't let paint get too thick. If you're painting along and all the detail is getting filled in, YOU'RE USING TOO MUCH PAINT. The sure sign of a crappy paint job is where you can't see detail. Don't use a whole lot of paint on the brush at any one time. When you apply paint onto the miniature, keep going over the area you're painting until you've spread around the paint you put on the brush. Remove paint off the brush if you have to so it's the thinnest possible coat. Remember, there may be as many a 4 or 5 coats of paint and if any one of those fill in the detail, it will look bad.
Make sure you have plenty of light. I have two lamps on my desk and sometimes wish for a third. Without enough light, you can't see the true color of the miniature, you make mistakes more easily and it's easier on the eyes.
Ok, on with the painting and good luck!
Step One: Buying Brushes
You can't do a good paint job without a good brush. I generally don't like the brushes sold in model/gaming stores because they don't last. Painting miniatures is about the worst thing you can do to a brush and cheap brushes won't last one or two miniatures before it will have to be replaced.
Go to an art supply store to buy your brushes. They will be more expensive, probably $3-6 per brush but they will last ten times longer than the cheap ones sold at hobby stores. You may have to experiment to see what kinds of brushes hold up the best but good Sable brushes seem to me to last the longest and keep their points.
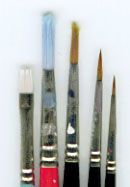
The basic brushes that you'll probably need are as follows. A fine brush for detail work, A not-quite-as-fine brush (approx 1/16" wide at the base) for secondary color painting, a medium brush (approx 2/16" wide at the base) for the primary color, a large brush (approx 3/16" wide at the base) for priming and other large tasks and a flat brush about the same width as the medium brush (I found white nylon brushes for this kind work best) for drybrushing. Pictures of the ones I use most often are below (actual size).
One last note, if you plan on doing a lot of miniature painting, get yourself an airbrush and compressor. This will save you hours and hours of time in priming and painting the base color.
Step Two: Buying Paint
There's a lot of kinds of paint out there and every person has their own preferences and their own style. I'll briefly touch on some of the advantages of each and what my preferences are. Coming from an art background, I use a lot of different things to get effects like I want.
Acrylic Paint(Tamiya, Testors and Games Workshop are all good) : This kind of paint is water soluble so it's great for clean-up and is usually pretty durable and safe. There are a lot of nice colors but in general aren't quite as brilliant as Enamel. Also, when acrylics dry they won't dissolve when painting on top with any other kind of paint. This is good and bad; good because you can't accidently screw up what you painted before, bad because you have to do any blending before it dries which usually isn't a very long time.
Enamel Paint (Testors Model Master brand is what I prefer): This is the usual model paint and is thinned with paint thinner usually sold in the same rack. Though somewhat toxic, there is a wide variety of colors available which sometimes are more brilliant than acrylics. Enamels generally paint on thinner than acrylics and you can do some nice blending effects on your miniature after the paint is dry since thinner will re-liquify dried paint. A little worse for clean-up but not too much trouble.
Gouache: I doubt you'll ever use this stuff unless you're from an art background but this kind of paint is sold in tubes and is water soluble (even when dry!). The colors are really brilliant but they do have a tendency of fading if in bright light for long periods of time. This is not a very durable paint either and clear coating is absolutely required. Besides the colors, the cool thing about this paint is you can do blending effects like enamel after it's dry.
Dyes (Dr. Martens): Again, something you probably will never use and they fade quickly in bright light. I only use them when I'm doing some special effects. They are extremely sensitive to water and have a nasty tendency of bleeding into paint that isn't quite dry (and gouache in particular even when dry).
Step Three: Putting Together The Miniature
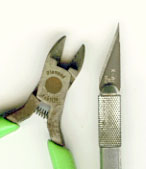
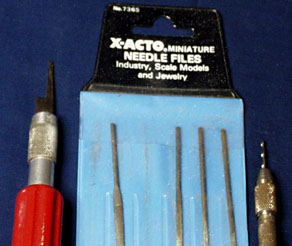
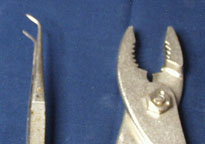
Some things you'll need: An X-Acto knife (#11) is all that is required and if you can, a pair of small cutters (like wire cutters). The cutters save a lot of time and save blades for the xacto when cutting through thick flash. Some other useful tools but certainly not necessary are a hand saw, jewlers files, hand drill, tweezers and pliers.
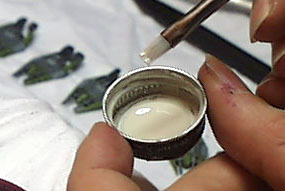
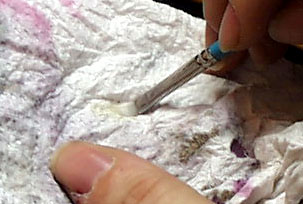
Superglue/Krazy glue: Any kind of Cyanoacrylate glue works fine. I also highly recommend getting some accelerator as well (Zap-A-Gap), it will save a lot of time holding parts together. Accelerator basically accelerates the hardening of cyanoacrylate glues. On a side note, the accelerator usually comes in a little pump spray bottle -- get rid of it! That stuff is pretty toxic and when you use the spray pump, you usually miss the miniature and spray your hand instead in addition to filling the air with atomized accelerator...not good for the lungs. Go to a plastics store (look in the phone book under plastics and look for any place that says materials and supplies) and pick up a bottle with a really thin metal tube as the dispenser (picture below) and dump the accelerator into it. You only need a drop or two to harden the glue and it is a lot easier when you have a needle point to accurately place the drop. It will also make one bottle of the accelerator last forever.

Anyway, I digress...The first thing you should do is clean all the parts of flash (the bits of metal that are a part of the mold process that you need to remove). Most of this comes off easily but a lot of times are hard to spot when in crevices and other hard to reach places. If parts are on a sprue (a hunk of metal with some of the parts attached to it) that's where the cutters come in handy.
Once all the parts are cleaned, then just start gluing them together. Again patience is the key. Put some glue where the two parts meet (on either part, usually the female side) and stick the parts together. If you're using a fast acting glue like Krazy glue, place them together quickly and hold them in place as accurately as you can since you will have to break apart the miniature and scrape off the glue (a real pain) in order to fix it. DO ONE PART AT A TIME; in general, don't try to glue several parts at the same time. Naturally there are exceptions to every rule but the faster you try to work, the more mistakes you will make. I like using a slower acting glue with the accelerator, that way I position the parts the way I like them, adjust my hand position so that one hand can hold both parts together in the right way and use the other hand to apply the accelerator. Once the drops of accelerator hit, you only have a few seconds before the glue will harden.
MAKE SURE ALL THE GLUE IS DRY BEFORE PROCEEDING! Take a break! Painting on wet superglue is INSTANT DEATH to the brush you're using. I know, I learned the hard way.
Step Four: Priming The Miniature
I find a paint job is a little more durable and you get more consistent color when you prime the miniature first (paint a layer onto the miniature that is a neutral color and gives something for your real paint job to stick to).
There are a couple of ways you can do this and they all work to various degrees of success. When convenient, I like to use an airbrush because it is very controlable and puts a very thin layer of paint on the miniature. Spray paint is another option but sometimes it goes on thicker than you want. If you use spray paint, I think Krylon automotive primer is about the best and either white or grey. Hand painting is naturally the last option and certainly not undesireable. Most of my miniatures are hand primered and that is what I will go in depth about.
When hand painting the primer coat, KEEP IT THIN! You don't really have to worry about varying thickness of the paint or seeing streaks since it's going to get covered up anyway. I personally like to use Acrylic paint to prime the miniature with because it is more durable and is very resistant to whatever I paint on top of it and won't dissolve. Don't thin the paint down to get a thin coat because very thin paint doesn't like to stick to bare metal. Just make sure that the entire miniature is covered so that no bare metal is showing.
What I do is put a little paint on the end of the brush and paint that onto the miniature and make it go as far as possible. I keep brushing the areas that I've painted in all directions so that I make sure the paint isn't filling up the details and use the excess paint that's picked up to paint other areas of the miniature.
By the way, my favorite color to prime miniatures is Testors Acrylic Gunship Gray or Acrylic Light Gray. A lot of grays made by testors are either greenish or blueish but Gunship Gray is a really nice gray that is very neutral in color. It makes a really good base for most darker/military paint schemes. I use the Light Gray when I'm going to pain lightly colored paint schemes. It takes a lot of coats of white to cover up dark gray. Remember that the primer usually affects the final color of the miniature.
Take a break...that's enough painting for right now.
Step Five: Painting The Base Color
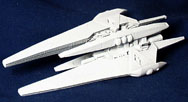
Most miniatures have a main color. Using Babylon 5 miniatures as an example, Minbari ships are mostly blue, Earth ships are mostly gray, Centauri ships are a pinkish purple. Basically, paint the color that is going to be most prominent on the miniature.
This step is almost like priming, you're just putting paint on not worrying about accuracy but trying to get a nice even flat coat that is as thin as possible.
I use either the medium brush or the large brush for this depending on how big of an area I'm covering. If you know an area isn't going to be that color, don't bother painting it. Just paint the areas you need to and don't worry about the edges of that painted area, it'll be fixed later.
At this point I like to use Enamel so that if I make a mistake in the next step, it is easier to fix.
Drink a coke and relax...that's enough painting for now.
Painting a Narn G'Quan example:
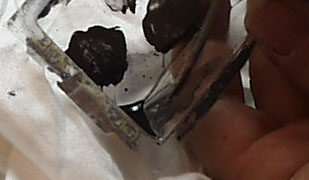
Stripping Paint on an Octurion:
Step Six: Painting Secondary Colors
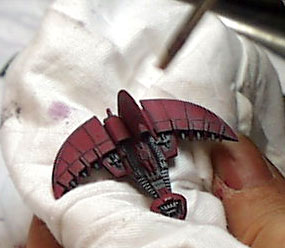
Before you continue, one thing I've found helps prevent the need for touch-ups when you're almost finished with the miniature. Go to a hardware or similar store and buy a bag of painters rags (for about $1). These are really useful. If you have an old T-shirt that you can cut up that works just as well (in fact that's what the bag I bought consisted of). Whenever you hold a miniature from now on, hold it in the cloth. You could get cotton gloves but I like to set the miniature down with the cloth so the table doesn't damage it either. This will prevent your fingers from rubbing off the paint on the edges and raised detail of the miniature while handling requiring you to touch it up later. Finger oils are the main culprit for this, wash your hands too before you work on miniatures. For this particular miniature, I wasn't too worried about it at this point but you'll see the rage later on.
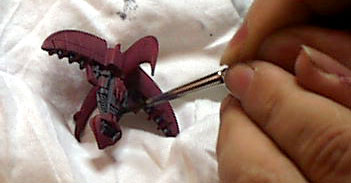
Now you paint all the areas that you didn't paint in the step above. This time you do need to watch the boundaries. Sometimes this is the point where you paint some detail work like camoflage patterns and the like but nothing more major than that. When you're painting on top of or near the primary area you painted, go slowly and be careful but it certainly isn't the end of the world if your brush slips. Note how I'm bracing the painting hand with the hand holding the miniature. This makes my hand a lot steadier.
If you screw up and you're using enamel, you can just dip your brush in the thinner and "erase" your mistake and repaint that area. If you just make the mistake with Acrylics, before you finish saying D'oh! stick your brush in the water and drench the mistake fast because once it dries, you're stuck and if it's thick enough you'll have to strip some paint. Otherwise paint it over with the base color again and try again.
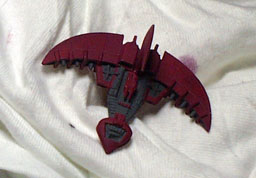
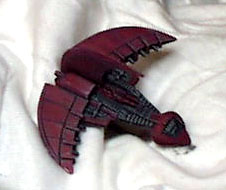
Ok, at this point, the miniature should be looking pretty good. Kinda plain and flatly colored but decent. Few people actually make it this far and when they do, most of those stop here.
Just like you should do right now....for a little while. This is probably the most strenuous part and you probably will need to take several breaks during this stage.
Painting Minbari ships example:
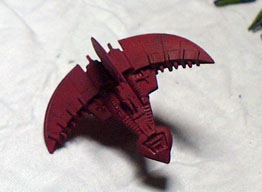
Step Seven: Washes
This step is pretty important. Take a dark color (I almost always use black) and really thin it down until it's like the consistency of a watercolor.
Take a small brush (not the really small one), fill it up with the thinned paint and paint it into the crevices and cracks of the miniature. Because the paint is so thin, it will naturally flow into those cracks so this isn't very hard.
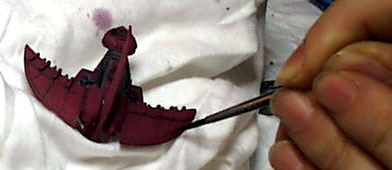
Also don't be too worried about slipping and getting some on your beautiful paint job. It will have the effect of making the miniature look weathered. If you're worried about a big blop on the miniature, grab a paper towel and suck it up before it dries. It's hard to really screw up this step. Just make sure your paint is thin enough. Acrylics and Enamels work about equally well for this. Also note that in these pictures, the miniature is sitting on a rag and again, my free hand is bracing the painting hand...very important for control.
Go watch Aliens again and let it dry. You should be nice and relaxed when you return.
Step Eight: Drybrushing
This is perhaps the most important step when painting miniatures. The plainest paint job in the world will look a hundred times better when you drybrush it.
Take your flat brush and dip the very tip into a light colored paint (usually white or a much lighter version of the color you're going to paint on top of). I'm going to use Camoflage Grey since the dry brushing will mostly show up over the grey areas.
Now brush it back and forth on a paper towel about ten times in the same place so it seems like most of the paint is off the brush.
Now run the brush over the miniature in quick strokes and you'll see the magic happen. The residual paint on the brush with catch on the raised portions of the miniature and the detail will suddenly pop out at you. In combination with the wash, you'll have a really good looking miniature at this point.
A little bit of experience will teach you the best places to use drybrushing and the hand techniques to get the best results. It's a little hard to demonstrate that here. Drybrush the miniature to your liking, some people like very little hilights others prefer very heavy, for me it depends on the color scheme and the miniature. I decide on a per-miniature basis.
Sit back and look at your miniature for a minute and say to yourself "Wow, that's cool." Now stand up and get out of the room, do something with yourself besides paint all day. Return when you're rested.
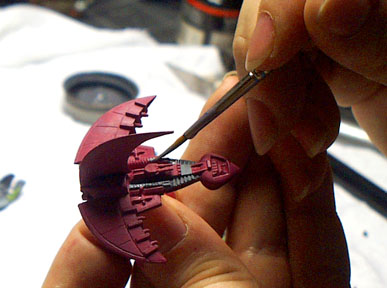
Step Nine: Detail Work
This step is optional and only for the really ambitious but to really make some awesome miniatures, it is essential. This is the point where you paint the little details like logos, insignia, chevrons or whatever. This is where you use the really fine brush.
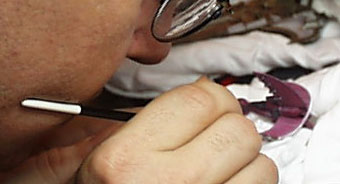
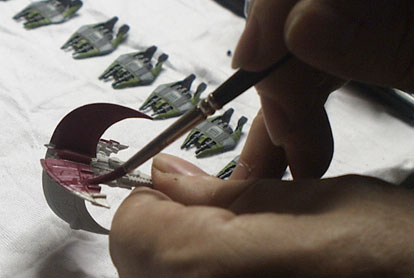
Sometimes you'll look at a miniature and think "How the hell can I paint a radioactive logo on the backpack of this miniature?" Well, it's all in how you hold the brush. A lot of people try to paint find detail like I'm painting the primary color in the picture above. NO NO NO!
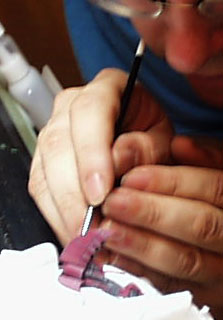
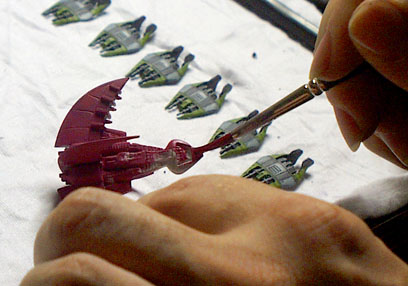
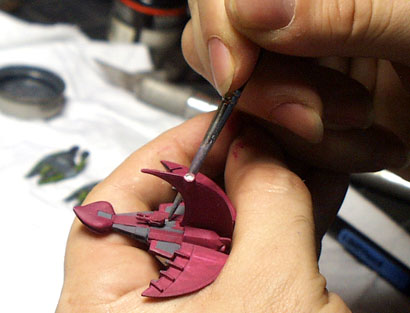
Put the miniature down on a cloth in a position that the painting area is easily accessable. Brace your painting hand with your free hand like I said before (sometimes that's enough). If you need more control, place the back end of the brush against your cheek like the pictures above. Your cheek will provide a third brace and make even the shakiest hand steady. You should be able to paint almost the tiniest detail without too much trouble this way.
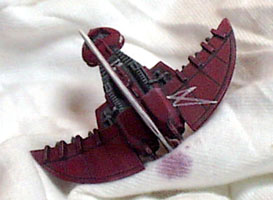
You'll note in this picture, I paint the outlines of the detail before I fill it in. By doing it this way, the chances of making a mistake are lessened and if a mistake does happen, it's easy to fix at this point. You'll also note that I'm painting the details white first, this is because the yellow paint I use is pretty thin and doesn't cover very well. The white helps prevent the primary color from bleeding and gives the yellow a light base to paint on.
The only other thing to remember is to use very little paint on the brush and make sure it is wet (I like it pretty thin too) . Small details are impossible with a big glob of paint on the end of the brush or the paint being so dry that you have to bear down on the brush to make it leave a mark. I usually clean my brush out and re-dip into the paint after EVERY stroke. Normally when I dip, I only dip the very, very tip of the brush into the paint and I make sure the paint is thin enough where the brush has paint and still goes to a point. It's very important for small details that the brush ends in a very sharp point.
By the way, for any of these steps, after I shake up the paint and take the cap off, I usually dip my brush into the paint that is stuck to the lid of the cap than the paint in the bottle. It gives me more control in the amount of paint I want on the brush.
You're almost done!!! Take a break.
Step Ten: The Clear Coat
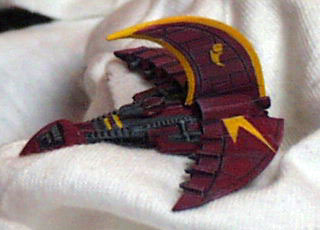
Most of the time I spray a bit of clear coat on the finished miniature in order to help protect it since they tend to get a lot of handling. The best stuff I've found so far is Floquil Figure Flat (in a spray can)...the stuff is awesome! I prefer flat coats (I know some people prefer the gloss or semi-gloss but to me, something gets lost using those, objects in the real world generally aren't very shiny). Ral Partha makes an acceptable brand of clear coat for miniatures too. What I like about Figure Flat is that even though it sprays on rather heavy and it looks like it pools in the crevices, it dries REALLY thin. It doesn't fill in the detail whatsoever! Get some, it's great.
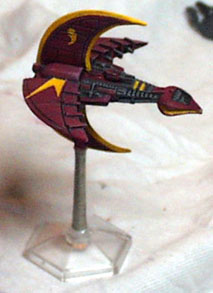
Finished but before the stand is painted black.
Let it dry...drink another coke, you need it...and you're done! You should have an awesome looking miniature now and be the envy of most of the people at the gaming conventions.
One Last Thing
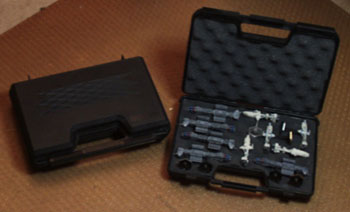
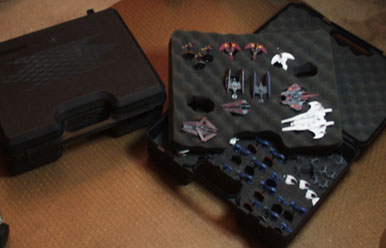
If you decide to become a serious miniature painter, you'll need a case to put your miniatures in. The best cases I've found are Doskocil brand pistol cases. They have a small, single-handgun case which is good for carrying around a few prized miniatures (top picture) and if you're one that collects vast armies, the 4-pistol case (double layer) is a great buy (bottom picture). They are sometimes hard to find though and can usually be found at sporting goods stores with decent gun sections (around $7 for the small one and about $12-$15 for the large). Miniature cases that sell at hobby stores are almost exactly the same thing and are two to three times the price. These cases are the cheapest I've found and are very durable and will really protect your miniatures.
GOOD LUCK AND HAPPY PAINTING!